Programs, Plugins, and Scripts
- I use the Discreet Dark color scheme, which ships by default in max. Go to the customize menu > load custom UI scheme, and choose the dark scheme. (it's named differently based on which version you have, but all have the word "dark" in it).
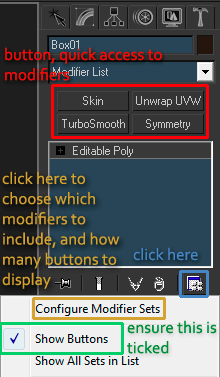
- Modifier buttons. Use these for the modifiers you use the most often. They are buttons which allow you to add a modifier just by clicking on them. The image to the right should explain how to add them. Click on the white box I've outlined in blue to get the white pop-up window. First click Show buttons, and 8 should appear. There are presets but I like to make my own. I change number of buttons to 4, and then add the four you can see.
- I install the show/hide trackbar script to reclaim that screen space, since I am not an animator. Add it as a button to toggle the trackbar and timeline on and off.
- For Unwrapping, I use this PSD path unwrapper script to get UVW coordinates as a vector layer in a photoshop file. Follow the directions carefully, it's the most complicated plugin I've ever installed. The directions work if you follow them exactly. The benefit of using this over a pixel version, is that you can show and unhide extras in Photoshop using ctrl+h and vectors are considered extras. This way you don't have to scroll up to your wireframe layer and hide it before saving to preview in max. It also means that the UVs stay infinitely narrow no matter how far you zoom in, unlike white pixels which stay pixel sized as you zoom in.
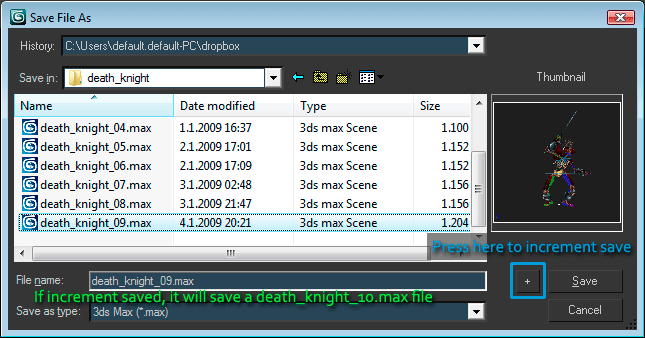
- Customize your keyboard shortcuts and your quad menu. I have detach added right above attach in my quad menu, and assigned "D" to repeat last command, just like in Maya. I have ctrl+` set to save as, so that I can save an increment save each time. I have f5 set to flat display mode, so I can see my textures unlit.
- Polyboost! Polyboost is a set of modeling add on tools. I only use a few of the tools, but they are invaluable. The ones I use are geopoly, which turns any polygon into a perfect equirectangular poly (4 sided shapes become perfectly square, 5 sided become perfect pentagons, etc). I use remove all smooth groups to get rid of smoothing on my low poly models. I use grow loop and grow ring, which grows the selection by one along the edge ring or edge loop, depending on your selection. I also like dot-loop, which gives you an edge loop, but only selects every other edge. Handy for some high poly details like ridges.
- UVtools (original site is down, so here are three mirrored downloads, the one I use, an older version, and a modified one that should work on the newest versions of max) This adds a lot of nice features to the unwrap panel, including align to vertical and align to horizontal, for super neat UV layouts. It also has nice rotation features as well. Copy the files into your Max folders, the TGA into UI/Icons, and the .mcr into UI/macroscripts.
-
Learn the shortcuts!
- alt + e = extrude
- alt + r = ring select
- alt + l = loop select
- z = center viewport on selection
- f3 = toggle wireframe (tapping this twice will return you from another viewtype to normal view)
- 1 = vertices (in edit poly mode)
- 2 = edges (in edit poly mode)
- 3 = open edges (edges along a hole in a mesh) (in edit poly mode)
- 4 = faces (in edit poly mode)
- 5 = sub-elements (connected chunks of triangles) (in edit poly mode)
- 6 = exit sub-object mode (in edit poly mode)
- The modification keys W movement, E scale R rotate.
- The viewport keys L left, B bottom, F front, P perspective. (I assign ctrl + L to right view, and ctrl + B to back view)
- v = viewport pop-up menu, and from there you can use hotkeys to get the different views.
- when in a sub object mode like vertices, hold ctrl and click on another sub object mode like faces, to convert your selection. Hold ctrl+shift to only get the the sub objects contained completely by the current selection.
- Unfold 3d Magic. My favorite relaxing and unwrapping program. I'm still using an older version with no internal max plugin, but the new versions have internal max plugins. You draw the seams you want, and it relaxes. Fast, and clean. I have compared it to several other relaxing scripts within various programs, as well as 3rd party relaxers, on difficult objects, and I liked the results from Unfold3d the best. It has a help menu and tutorials that cover it's use, but if you need a good relaxer for your initial UV layout, this is it.
- For inside of max with quick small relax jobs, I use this relax UVs script. It was originally from www.Microcan.nl but he has since removed the script, so I'm hosting it here. You'll have to manually add a button or quadmenu entry for it. You can find it in the Main UI Group, in the uvHelp category.
- Shell modifier = standard out of the box modifier, but few seem to know about it. Turns a flat plane into a 3d object with a thickness you specify. You can say whether it should extrude inwards, outwards, or both. I use this for all belts, straps, and thin objects that are a pain to keep track of as a 3d object. Model it as a flat plane and add a shell modifier to give it thickness.
-
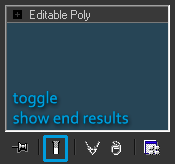
Toggle end results = a button just under the modifier stack that will show the end result of all modifiers, even if you're at the bottom of the stack. I assign this to the ` key, and I can preview
a shell modifier, a turbosmooth, and a symmetry modifier, while still inside of the edit poly modifier and moving around vertices.
- Billboard Generator I use this to create my reference planes. Assign an image, and it will create a plane with that image assigned as a texture, in the correct aspect ratio so that the image is not squashed or stretched.
Main 2D program that I use is Photoshop CS4 64-bit Download trial.
-
Learn the shortcuts!
- [ and ] resize the brush
- X = toggles the foreground and background color.
- alt = hold it to let you color pick from the canvas. You can actually pick the color picker tool to change from a 1x1, 3x3, or 5x5 sample area. 1x1 gives you the exact color of the pixel underneath, but 3x3 and 5x5 take samples of the surouning 9 and 25 pixel areas respectively.
- Hold down space while drawing a line, a marquee selection or shape, while still holding the mouse button down, in order to move where the origin starts.
- Hold shift to contrain your brush or line to horizontal or vertical (whichever is closest)
- ctrl + h = show hide extras (grids, vectors, guide lines, etc)
- ` = while viewing a layer mask or alpha channel, this will allow you to see it as a quick mask, overlayed in red over the actual RGB layer.
- ctrl + click on a layer will give you a selection based on the contents of that layer.
- ctrl + shift + click on a layer will add to your current selection based on the contents of that layer.
- ctrl + alt + click on a layer will subtract from the current selection based on the contents of that layer.
- ctrl + alt + shift + click on a layer will contract the current selection to just the area occupied by the contents of that layer
- ctrl + shift + i = will invert the current selection
- alt + delete = fills the layer with the foreground color
- ctrl + delete = fills the layer with the background color
- D = resets foreground/background to white/black
- All tool shortcuts (b for brush, l for lasso) will shuffle through the alternate tools. B for brush, then shift + B gives you the pencil tool. L for lasso, shift + L for polygonal lasso, shift + L for magic lasso, etc.
- Use adjustment layers. They are non destructive and you can use masks, as well as change the values later without losing information. Everything you can do from image > adjustments is available as a non-destructive adjustment layer.
- Minimum and Maxium filters. Maximum expands white areas outward based on a number of pixels you specify. Minimum contracts. Useful on masks.
- Color balance. Allows you to shift the shadows, midtones, and highlights separately. Add a little blue to your shadows, red to your midtones, and yellow to your highlights. Especially useful for skin, be sure to play with the "preserve luminosity" check box. Sometimes I leave it on, other times off.
- Actions! If you find yourself doing something repeatedly, make an action for it. I have one that I use all the time, which saves the current document as a TGA. I work on a PSD, then use the action to save out a 32 bit TGA. You can assign hotkeys to actions so that you can just press the function key and it will run that action.
- Crazybump This is probably the single best normal map related tool or plugin other than the true sculpting apps like Mudbox or Zbrush. It has all types of uses, but for me, the main use is that it is like the NV filter on crack. The black and white conversions to normal maps have way more volume than the same b&w images run through nvfilter. It allows you to combine normal map layers, as well as diffuse layers, and even convert normal map layers into pseudo Ambient Occlusion maps to help you make your diffuse maps read better and work well with your normal map. I've only scratched the surface of what it can do. As a side note. DO NOT PIRATE THIS SOFTWARE. Ryan (the author) is a very talented individual who made this himself. He is not a corporation with millions of forms of revenue. This is his main form of income, and he works on improving it constantly. If you find it useful, pay for it. It's cheap and can save tons of time in your workflow.
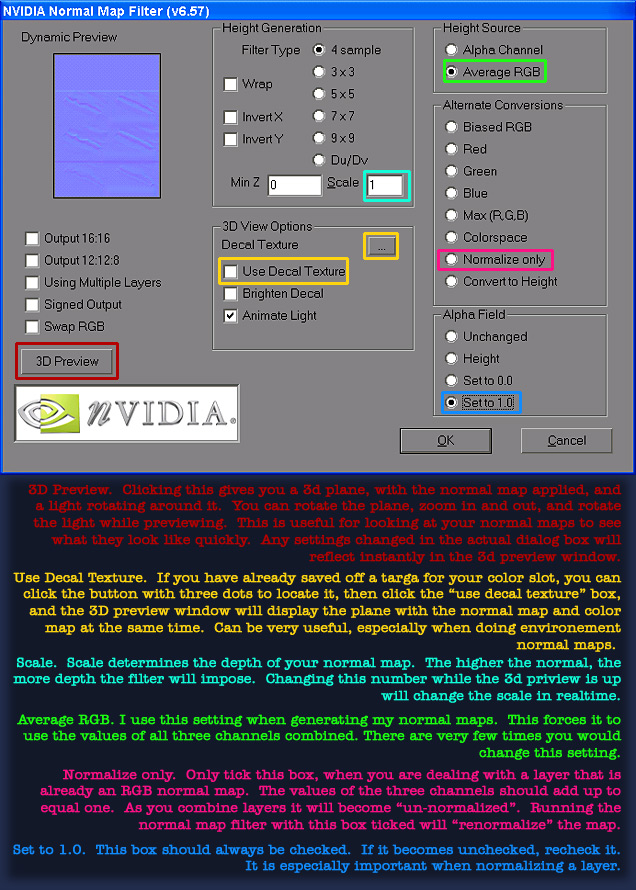
- NVfilter This filter allows you to convert black and white layers to normal map information. For more details on how to use this in conjunction with baked normals, refer to this page of my normal map work flow tutorial. NVfilter is free, and can be slightly faster than Crazbump since it's a photoshop plugin, but it's only really comparable with super shallow details. Anything that is supposed to be thicker than a few mm in depth should be done in Crazybump.
Main 3D painting program that I use is Bodypaint, by Maxon. Download trial.