Masks are a powerful tool for texture work in photoshop. They allow you to limit the area of a layer using a greyscale image. The lighter the pixels of the image, the more the area is revealed, and the darker, the more it is hidden. The real benefit is that masks are independant of the actual contents of the layer, so you can edit the two separately.
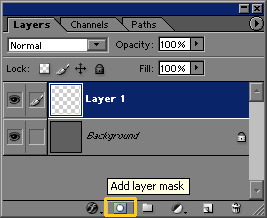
Click here to create a mask for the current laye
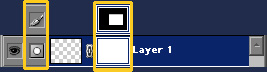
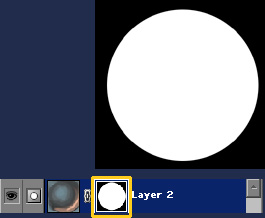
This is the mask to the right of the layer. If you have a current selection marquee, it will create the mask to reveal the selection area, and hide what lies outside the selection area, like the top thumbnail. If nothing is selected, the mask will be entirely white and the whole layer revealed.
If you click on the mask, the icon on the left changes to a square with a circle. This indicates you are currently painting on the mask, not the layer. Click on the layer, and it will change to the paintbrush, which indicates you are painting on the layer and not the mask.
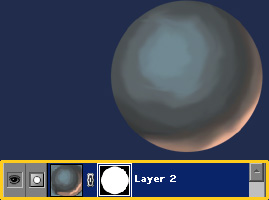
I drew a circular marquee before clicking on the mask button, and it created a mask that hides all but the circle area of the layer. The benefit of this is that I can paint on the layer, and it will always stay circular. Normally I would have to reselect the circle area, or erase afterwards to keep the layer as a circle. This way you make the mask once, and it maintains the layers shape and visibility.
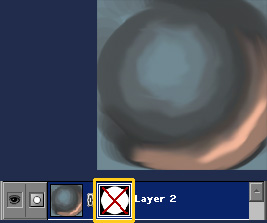
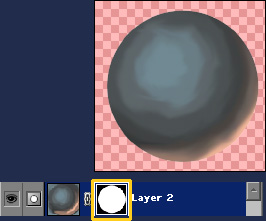
Shift clicking on the mask disables it. This shows you the entire contents of the layer. You can see how freely I was able to be with my brush strokes, because the mask kept the layer neat and tidy. One of the largest benefits in my mind of using masks is shown in this image. The smudge brush works perfectly because the entire layer is full of information, so it doesn't give the artifacting that comes from smearing the edge of the color with nothing. You can smear the actual edge, and it will not only behave correctly (because there is information on the layer past the edge of the mask) but it will also remain the exact size it was before, because the mask is containing it. If you have ever tried to smudge on a layer that is not solid, you will know what I mean.
If you hold down the ALT key and then click on the mask, the view will change to show you the mask directly. This can help when editing the mask with the normal paint tools. ALT+click the layers icon to go back to viewing the layer. If you hold down the CTRL key and click on the mask, it will give you a selection marquee of the contents of the mask. You can copy and paste on a mask, but only when the mask is visible by ALT+clicking.
While you are viewing the mask (ALT+click the mask icon) if you hit the ~ key photoshop will overlay the color and mask together, using red to indicate what pixels the mask is currently hiding. The darker the pixel of the mask, the redder the overlay. Hit ~ again to go back to viewing the mask in black and white. This also works for the alpha channel of the entire image. Useful when working on the opacity map for a targa in a videogame texture.
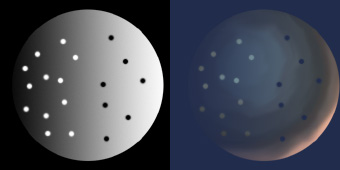
The black and white image on the left is the mask controlling the color layer on the right. You can see from this image how the intensity of the pixels in the mask control the opacity of the layer. The benefit is that the layer’s information is all still present, it’s just being hidden or revealed based on the mask. This gives you a much greater flexibility when working with a layer than using the erasor, or only painting within a marquee selection.

When the chain icon is present, the layer and mask are linked. Any free transforms or nudging will move both the layer and the mask together. When it is unchecked, you can free transform or nudge the layer and the mask individually. Free transforming or nudging just a selection will not move both at the same time. The default is checked, but sometimes you will want to uncheck it for certain instances.
Some final thoughts on using masks: