With today's mobile development low poly models, such as eyes, are on the rise again, but not everyone has experience creating them. A lot of people find it hard to figure out the best way to approach them. The following is the approach I have come up with.
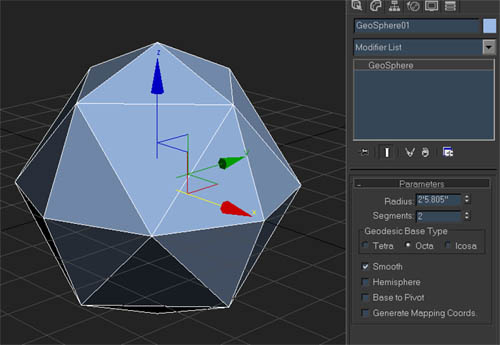
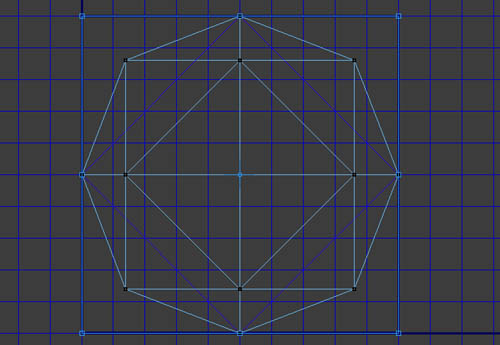
For the geometry, I start with a geosphere. Set the segments to 2, and the base type to octa.
Convert to editable poly, and select 4 faces on one side.

Delete the selected faces, and select the vertices along the newly created hole. This is going to be the back of the eyeball, so the faces are not needed.
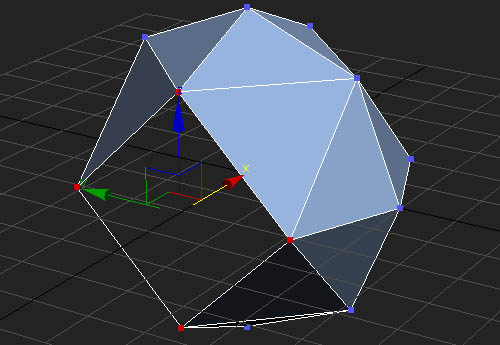
Scale the verts to about 140%, you want the sphere to always fill up the eye socket even when it rotates, and this will help.

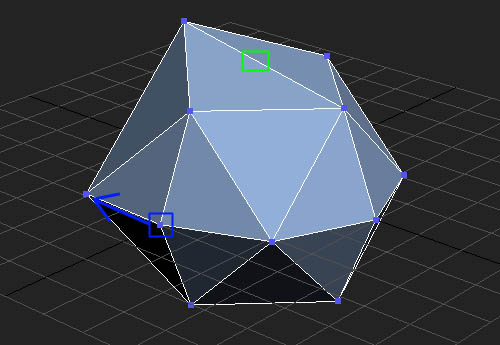
Target weld every other vertice on the next ring forward from the hole. This will reduce the poly's of this eye even further.
Target weld the vert in the blue box, to the vert on the edge of the hole, designated by the blue arrow. The green box shows where the last vertice was before it was target welded. The resulting eye is 20 poly's.
Add an unwrap UVW modifier and select all the faces.
Hit planar map, set to averaged normals.

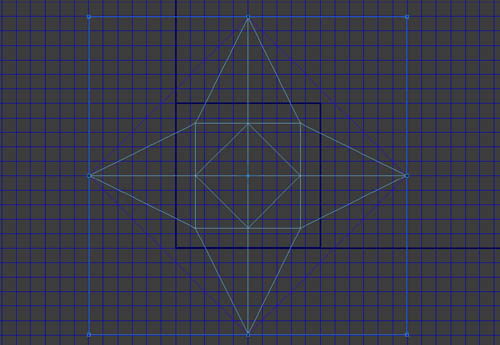
You should get UV's that look like this.
Hit planar map, set to averaged normals.
Select the outside 4 verts, shown in orange.
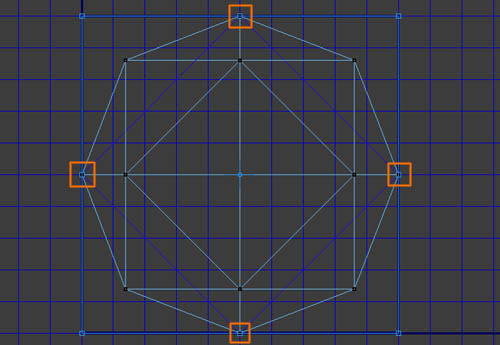
Scale them out till the UV's look like this.
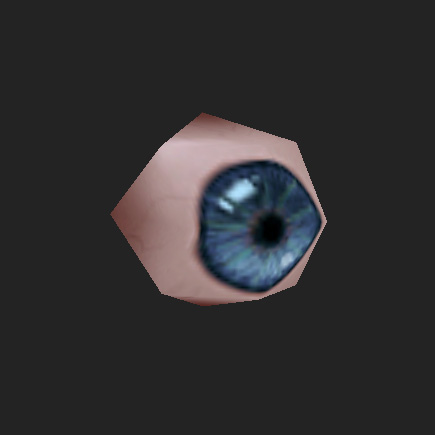
Scale the entire UV set down to whatever size you need, and put it on your UV layout where it fits the largest. I like to wait to place this until everything else is final, then I pick the largest area and put it in as large as possible. Remember the eyes are a huge focus point, and the more detail you can fit in, the more realistic your model will look.
The image map I am using is 128x128. I recommend you dragging them into Photoshop and really zooming in to examine each step. This is probably going to be much larger than you will be using, but I wanted for you to see the steps. most of the times my eyes end up on a 80x80 area.
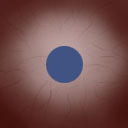
I pick as an eye fill color, a desaturated red, at about 70% value (0 being black and 100 being white).

The eye gets quite dark around the edges, so I pick a dark red to shade the outside.
Avoid using the circular gradient as it will look manufactured. Take your time and paint it by hand.

Next I go in and using the same red I paint some little veins. If you look in a mirror, they come further forward than you think.
NEW LAYER. I cannot stress this enough. You might have to move the iris several times, and you might have to change the eye color down the road. You have to make a new layer for the iris, or you will be looking at a hard job ahead of you. Fill this with your base color which should be a middle value, and about middle saturation. I am using blue. I use the circular marquee tool to give me a perfect circle.
Now select a dark color. This is going to be for the outer ring as well as the dark center. Do not use a color darker then about 5-10% as you want it to be colored somewhat. I will explain later the other reason. Paint a thin line around the outer area of the iris, and a dark circle for the pupil.
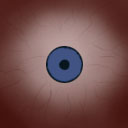
Still having this dark color selected, lightly draw lines radiating from the outer ring to the pupil. These are the start of the muscles of the eye. if you have the pixel resolution to put them in, please please do. Solid color eyes are not convincing.
Now select a lighter color blue than the iris fill color. Also change the hue, I am making mine greener. Draw more lines radiating out from the center.
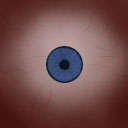
The next step will really add believability to your eye. Pick a neon color, like a really bright yellow or green. Now use it to highlight a few key areas of your iris.

Now pick a burnt orange/reddish color, and paint a few lines radiating out from the pupil, but these should be very short, and not reach the outer ring.

Pick your original dark blue, and pull short lines from the outer ring in, they should only be a few pixels long. Do the same from the pupil out.
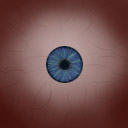
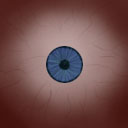
All right, the eye now has all the color information, now to make it look 3-dimensional. Using your dark blue, and a light blue, you are going to simulate the concave nature of the eye. Darken the top, lighten the bottom. Do not use dodge and burn.
The eye looks nice and concave now. But it looks like it is floating above the white below, so using your original dark red, and a very light pink, we are going to fix this. Create a slight shadow ring of the dark red under the iris (this should be super easy since the iris is on the layer above). Using the whitish pink, give the white of the eye a slight highlight.

Now for the highlight on the eye itself. Depending on the engine, you may or may not need to paint this harsh specular, but I always enjoy the look of it on, so here we go. There will be two highlights. One from directly where the light hits, and one from where it is refracted to the other side of the cornea, but remember the eye will modulate this color, so change the hue of the highlight. I like shaping the highlight like a lightsource if I have the pixel space. This highlight is that of a fluorescent ceiling light, and is tinted blue. The sub-highlight on the other side, is a deeper blue.

Select pitch black (this is why I said to only use a 10% for the ring and pupil) and deepen the very center of the eye.
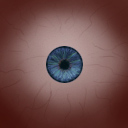
The last step is a trick I picked up from my good friend DoZo from Midway. Select all, Edit > Copy merged, and paste a new layer on the top that is a flattened version of everything you have made. Now go to Filter > Sharpen > Unsharp mask and set it around 30-40.

The iris ends up being too large on this eye, but because it is on a separate layer, resizing is as easy as ctrl+t. Just rerun the unsharp mask step after it is the right size.
Remember if you are mirroring the eyes, that you either need to make sure the highlight is on the same side. or you can paint the highlight directly above. Its up to you. Just don't leave them coming from opposite directions.